
FreeFileSync Open Source File Synchronization
It looks like an ad blocker has blocked the ads.
 The FreeFileSync project is 100% dependent on ad revenue and donations to stay alive. Instead of the ads, and
after FreeFileSync has proven useful to you, please think about supporting with a donation.
The FreeFileSync project is 100% dependent on ad revenue and donations to stay alive. Instead of the ads, and
after FreeFileSync has proven useful to you, please think about supporting with a donation.
The FreeFileSync project is 100% dependent on ad revenue and donations to stay alive. Instead of the ads, and
after FreeFileSync has proven useful to you, please think about supporting with a donation.
FreeFileSync User Manual:
#Quick Start
Command Line
Comparison Settings
Daylight Saving Time
Exclude Files
Expert Settings
External Applications
Macros
Performance
RealTimeSync
RTS: Run as Service
Schedule Batch Jobs
Scripting
Synchronization Settings
(S)FTP Setup
Tips and Tricks
Variable Drive Letters
Versioning
Volume Shadow Copy
 #Quick Start
— Folder Comparison and Synchronization —
Basic Usage:
- Select left and right folders.

- Compare them.

- Choose synchronization settings.

- Click Synchronize to start the synchronization process.

Note
For detailed instructions on setting up common synchronization scenarios, check out the FreeFileSync video tutorials.
For detailed instructions on setting up common synchronization scenarios, check out the FreeFileSync video tutorials.
Main Dialog Overview
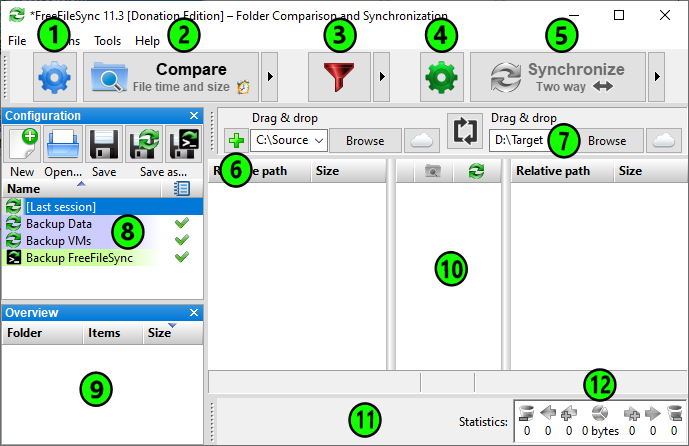
- Change comparison settings
- Start comparison
- Include/exclude specific files
- Change synchronization settings
- Start synchronization
- Add folder pairs
- Select left and right folders
- Save/load configuration
- Tree overview panel
- Preview synchronization
- Select categories to show on grid
- Synchronization statistics
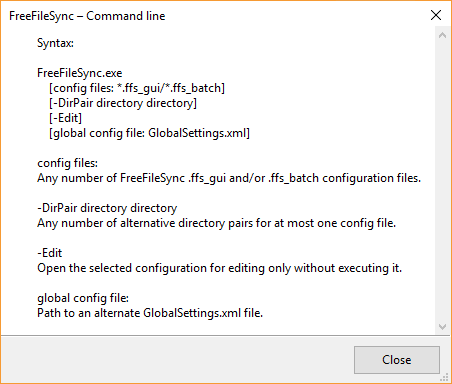
Command Line Usage
FreeFileSync supports additional synchronization scenarios via a command line interface. To get a syntax overview, open the console, go to the directory where FreeFileSync is installed and type:
FreeFileSync.exe -h or FreeFileSync --help
1. Run a FreeFileSync batch job
To start a synchronization in batch mode, supply the path of a .ffs_batch configuration file as the first argument after the FreeFileSync executable:FreeFileSync.exe "D:\Backup Projects.ffs_batch"
After synchronization, detailed results are written to standard output in JSON format. You can parse this output with a script to add further customizations.
To check if synchronization was successful, evaluate the process exit code:
Exit Codes
0 Synchronization completed successfully
1 Synchronization completed with warnings
2 Synchronization completed with errors
3 Synchronization was cancelled
0 Synchronization completed successfully
1 Synchronization completed with warnings
2 Synchronization completed with errors
3 Synchronization was cancelled
Windows: A batch script (.cmd/.bat) that evaluates this code may look like this:
"C:\Program Files\FreeFileSync\FreeFileSync.exe" "D:\Backup Projects.ffs_batch"
if not %errorlevel% == 0 (
::if the return code is 1 or greater, something went wrong:
echo Errors occurred during synchronization...
pause & exit 1
)
if not %errorlevel% == 0 (
::if the return code is 1 or greater, something went wrong:
echo Errors occurred during synchronization...
pause & exit 1
)
Note
If you're running the batch job unattended, ensure that your script is not blocked by a notification dialog. Consider the following options when setting up the FreeFileSync batch job:
If you're running the batch job unattended, ensure that your script is not blocked by a notification dialog. Consider the following options when setting up the FreeFileSync batch job:
- Enable Auto-Close to skip the summary dialog after synchronization.
- Set up error handling to Ignore errors or Cancel to stop the synchronization at the first error.
2. Start a FreeFileSync GUI configuration
If you pass a .ffs_gui configuration file, FreeFileSync starts in GUI mode and immediately begins comparison (but only if all directories exist):FreeFileSync.exe "D:\Manual Backup.ffs_gui"
3. Customize an existing configuration
You can replace the directories of a .ffs_gui or .ffs_batch configuration file by using the -DirPair parameter:FreeFileSync.exe "D:\Manual Backup.ffs_gui" -dirpair C:\NewSource D:\NewTarget
4. Merge multiple configurations
When more than one configuration file is provided, FreeFileSync merges everything into a single configuration with multiple folder pairs and start in GUI mode:FreeFileSync.exe "D:\Manual Backup.ffs_gui" "D:\Backup Projects.ffs_batch"
5. Use a different GlobalSettings.xml file
By default, FreeFileSync uses a single GlobalSettings.xml file containing options that apply to all synchronization tasks; for examples, see Expert Settings. If you want FreeFileSync to use a different settings file instead, just add the file path via command line:FreeFileSync.exe "D:\Different GlobalSettings.xml"
Comparison Settings
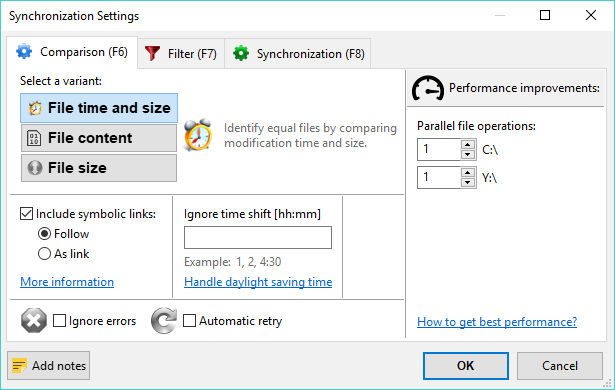
Comparison Variants
FreeFileSync compares two folders by analyzing the relative paths of the files they contain, i.e. the paths relative to the base folder pair. If the relative path matches, FreeFileSync decides how the file pair is categorized by considering the selected comparison variant:1. Compare by File Time and Size
This variant considers two files equal when both modification time and file size match. It should be selected when synchronizing files with a backup location. Whenever a file is changed, its file modification time is automatically updated. Therefore, a comparison by file time and size will detect all files that should be synchronized. The following categories are distinguished:
- file exists on one side only
- left only
- right only
- file exists on both sides
- different date
- left newer
- right newer
- same date
- equal
- conflict (same date, different size)
- different date
2. Compare by File Content
Two files are marked as equal if they have identical content. This variant should be selected when doing consistency checks to see if the files on both sides are bit-wise identical. This is the slowest of all comparison variants, so its usefulness for synchronization is limited. If used for synchronization, it can serve as a fallback when modification times are not reliable. For example certain mobile phones and legacy FTP servers do not preserve modification times, so when file sizes match, the only reliable way to detect differences is to compare the actual content.
- file exists on one side only
- left only
- right only
- file exists on both sides
- equal
- different content
3. Compare by File size
Two files are considered equal if they have the same file size. Since it's possible for files that have the same size to have different content, this variant should only be used when file modification times are not available or reliable, e.g. in certain MTP and FTP synchronization scenarios, and where a comparison by content would be too slow.
- file exists on one side only
- left only
- right only
- file exists on both sides
- equal
- different size
Symbolic Link Handling
FreeFileSync lets you include symbolic links (also called symlinks or soft links) when scanning directories instead of skipping them. When included, you can select between two ways to handle them:- Follow:
Treat symbolic links like the object they are pointing to. Links
pointing to directories are traversed like ordinary directories, and
the target of each link is copied during synchronization.
- As link: Include the symbolic link object directly. Symbolic links will be shown as separate entities. Links pointing to directories are not traversed and the link object itself is copied during synchronization.
Note
- FreeFileSync considers the following as "symbolic links":
– file system symbolic links
– volume mount points (NTFS)
– junction points (NTFS)
– WSL symlinks (Windows Subsystem for Linux)
– Google Drive shortcuts
- Windows: Copying symbolic links requires that FreeFileSync is started with administrator rights.
Daylight Saving Time (Windows)
Synchronization software often encounters ±1-hour shifts in file times after a Daylight Saving Time (DST) change. This typically happens when comparing a FAT32 or exFAT volume (referred to as "FAT") with an NTFS volume, such as when synchronizing a USB stick with a local disk. Files that were previously in sync are now shown as offset by one hour, even though they have not been modified.This occurs because NTFS stores file times in UTC format, while FAT stores them in local time.
When comparing times from these two formats, one must be converted to the other. Windows uses the current DST status and time zone for these calculations. As a result, the comparison is affected by current system settings, causing file times that were once the same to appear different after a DST change or time zone switch.
For more details on handling DST shifts in file times, see: Beating the Daylight Saving Time Bug
Solutions:
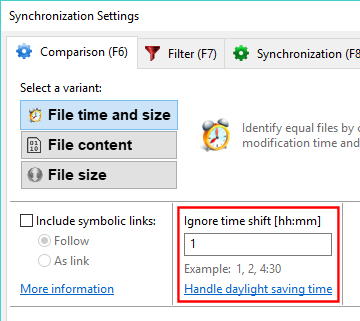
- In FreeFileSync's comparison settings, you can enter one or more time shifts to ignore during comparison:
To handle daylight saving time differences, enter a single one-hour shift.
If the differences are caused by changing the time zone, enter one or more time shifts as needed.
Note
File times must be equal or differ by exactly the specified time shift to be considered the same. Therefore, the time shift setting should not be confused with a time interval or tolerance.
- Alternatively, avoid the problem by only synchronizing FAT to FAT or NTFS to NTFS file systems. For example, since most local disks are NTFS and USB sticks are FAT, this issue can be solved by formatting the USB stick with NTFS as well.
Exclude Files and Folders with Filter
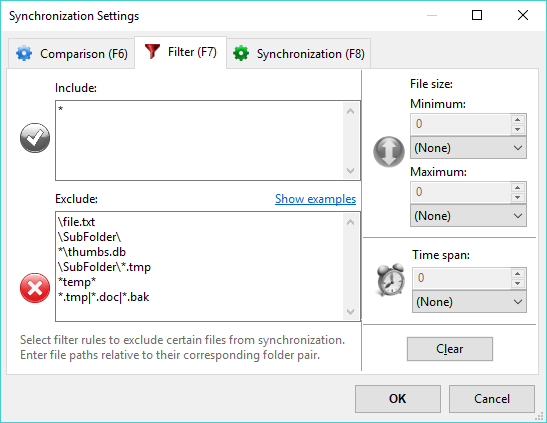
Files and folders are considered for synchronization only if they pass all filter rules: They must match at least one entry in the include list and none in the exclude list as shown in the filter configuration dialog.
- Each filter item must be a file or folder path relative to the selected folder pair.
- Multiple items must be separated by | or a newline.
- Wild cards may be used:
* means zero or more characters
? represents exactly one character
?* matches one or more characters - Filter matching is case-insensitive.
Example: Filtering Items in a Folder Pair
The following filter phrases assume a folder pair C:\Source <—> D:\Target, and they can be used for both the include and exclude filters.| Description | Filter phrase |
|---|---|
| Single file (or folder) C:\Source\file.txt | \file.txt |
| Single folder C:\Source\SubFolder | \SubFolder\ |
| All files (and folders) named thumbs.db | *\thumbs.db |
| All files (and folders) starting with the Z character | *\z* |
| All *.tmp files (and folders) in C:\Source\SubFolder | \SubFolder\*.tmp |
| Files and folders containing temp in their path | *temp* |
| Multiple entries, separated by a vertical bar | *.tmp | *.doc | *.bak |
| Files/folders inside subfolders of the folder pair | *\ |
| All files (but not folders) | *: |
Example: Complex filter rules with exceptions
Complex filter requirements can often be solved by using two folder pairs with the same source and target paths but different local filters. The first folder pair handles the default case. The second folder pair the exception.
C:\Source <—> D:\Target local exclude filter: \SubFolder\
C:\Source <—> D:\Target local include filter: \SubFolder\*.txt
C:\Source <—> D:\Target local include filter: \SubFolder\*.txt
Example: Exclude empty folders
Set *: as the include filter to match all files, but not folders. During synchronization some excluded folders will still be created if needed, but only if they contain at least one non-excluded item, that is, when they are not empty.
Note
- For simple exclusions: Instead of typing the filter phrase manually, go to the FreeFileSync main window, right-click one or more files from the list, and exclude them via the context menu.
- By default, a filter phrase can match both file and folder paths.
To match only one of them, you can give a hint:
1. Files only: append a colon (:) 2. Folders only: append a path separator (/ or \) - If the filter is matching a folder, all its files and subfolders are also (implicitly) matched. Thus the filter phrases SubFolder\ and SubFolder\* are synonymous.
- Both slash (/) and backslash (\) can be used as path separators.
Expert Settings
FreeFileSync includes several special settings that can only be accessed by manually opening the global configuration file GlobalSettings.xml. Note that this file is read once when FreeFileSync starts and saved again on exit. Therefore, you should only apply manual changes when FreeFileSync is not running. For the portable FreeFileSync variant, the file is located in the installation folder. For local installations, go to:| Windows: | %AppData%\FreeFileSync |
| Linux: | ~/.config/FreeFileSync |
| macOS: | ~/Library/Application Support/FreeFileSync |
<?xml version="1.0" encoding="UTF-8"?>
<FreeFileSync XmlType="GLOBAL">
<General>
<FileTimeTolerance Seconds="2"/>
<RunWithBackgroundPriority Enabled="false"/>
<LockDirectoriesDuringSync Enabled="true"/>
<VerifyCopiedFiles Enabled="false"/>
<FreeFileSync XmlType="GLOBAL">
<General>
<FileTimeTolerance Seconds="2"/>
<RunWithBackgroundPriority Enabled="false"/>
<LockDirectoriesDuringSync Enabled="true"/>
<VerifyCopiedFiles Enabled="false"/>
Contents of GlobalSettings.xml
FileTimeTolerance:
By default, file modification times are allowed a 2-second difference and still considered equal. This is required by FAT/FAT32 file systems which store file times only with a 2-second precision.
RunWithBackgroundPriority:
When synchronization is running, other applications accessing the same data locations may experience noticeable slowdowns. Enable this setting to lower FreeFileSync's file access priority at the cost of a slower synchronization speed.
LockDirectoriesDuringSync:
To prevent multiple synchronization tasks from reading and writing the same files, FreeFileSync instances are serialized with lock files (sync.ffs_lock). The lock files are recognized only by FreeFileSync, ensuring that at most one synchronization runs for a folder at a time, while other instances are queued. This ensures that only consistent sets of files are subject to synchronization. The primary use case are network synchronization scenarios where multiple users run FreeFileSync concurrently against a shared network folder.
VerifyCopiedFiles:
When active, FreeFileSync will binary compare source and target files after copying and report verification errors. Note that this may double file copy times and does not guarantee that data was not already corrupted before copying. Also, corruption may be hidden by reading valid data from various buffers in the application or hardware stack:
Does the CopyFile function verify that the data reached its final destination successfully?
External Applications
By default, when you double-click a row in the main dialog, FreeFileSync opens the operating system's file browser:| Windows: | explorer.exe /select, %local_path% & exit 0 |
| macOS: | open -R %local_path% |
| Linux: | xdg-open "$(dirname %local_path%)" |
You can quickly access all entries by pressing the corresponding numeric keys 0–9 or through the context menu (right-click). The first entry can also be executed by double-clicking on an item.
In addition to regular macros, the following special macros are available:
| Macro | Description |
|---|---|
%item_path% |
Full file or folder path |
%local_path% |
Creates a temporary local copy for files on SFTP and MTP storage. Otherwise identical to %item_path% for local files and network shares. |
%item_name% |
File or folder name |
%parent_path% |
Parent folder path |
- To refer to the item on the opposite side, append "2" to the macro name:
%item_path2%, %local_path2%, %item_name2%, %parent_path2%. - To generate a list of all selected items (separated by space), append "s" to the macro name:
%item_paths%, %local_paths%, %item_names%, %parent_paths%.
Examples:
- Launch a file content comparison tool:
Windows: WinMerge
"C:\Program Files (x86)\WinMerge\WinMergeU.exe" %local_path% %local_path2%
macOS: opendiff (requires Xcode)
opendiff %local_path% %local_path2%
Ubuntu: kompare (sudo apt install kompare)
kompare %local_path% %local_path2%
- Show file in Windows Explorer:
explorer.exe /select, %local_path% & exit 0Note
Explorer.exe doesn't set an exit code, but FreeFileSync will show an error message if it doesn't find exit code = 0 ("Success"). To mitigate, append (&) command exit 0 to set the exit code explicitly.
- Open command prompt for the selected item:
start cmd.exe /k cd /D %parent_path%Note
Since FreeFileSync doesn't automatically show a console window, start is used to open one. cmd.exe /k runs the following command without immediately exiting the console. cd navigates to the directory, even if it's on a different volume (/D).
- Copy the item path to the clipboard (alternative to using CTRL + C)
echo %item_path%| clip
- Write the list of selected file paths to a text file:
echo %item_path% >> %csidl_Desktop%\file_list.txt
- Preview files using Quick Look on macOS:
qlmanage -p %local_path%
- Pass a list of selected files to a script as command line arguments:
C:\my-script.cmd %local_paths%
Macros
All directory paths may contain macros, which are expanded during synchronization. The beginnings and ends of each macro are marked by a % character. In addition to special macros handling time and date, the operating system's environment variables may also be used.Internal Macros
| Macro | Example | Format |
|---|---|---|
| %Date% | 2026-07-31 | [YYYY-MM-DD] |
| %Time% | 195542 | [hhmmss] |
| %TimeStamp% | 2026-07-31 195542 | [YYYY-MM-DD hhmmss] |
| %Year% | 2026 | |
| %Month% | 07 | [01–12] |
| %MonthName% | Jul | [Jan–Dec] |
| %Day% | 31 | [01–31] |
| %Hour% | 19 | [00–23] |
| %Min% | 55 | [00–59] |
| %Sec% | 42 | [00–59] |
| %WeekDay% | 5 | [1–7] week begin may vary locally |
| %WeekDayName% | Fri | [Mon–Sun] |
| %Week% | 31 | [01–52] calendar week |
Environment Variables (Windows)
| Macro | Example |
|---|---|
| %AllUsersProfile% | C:\ProgramData |
| %AppData% | C:\Users\Zenju\AppData\Roaming |
| %ComputerName% | Zenju-PC |
| %LocalAppData% | C:\Users\Zenju\AppData\Local |
| %ProgramData% | C:\ProgramData |
| %ProgramFiles% | C:\Program Files |
| %ProgramFiles(x86)% | C:\Program Files (x86) |
| %Public% | C:\Users\Public |
| %Temp% | C:\Windows\Temp |
| %UserName% | Zenju |
| %UserProfile% | C:\Users\Zenju |
| %WinDir% | C:\Windows |
Special Folder Locations (Windows)
| Macro | Example |
|---|---|
| %csidl_Desktop% | C:\Users\Zenju\Desktop |
| %csidl_Documents% | C:\Users\Zenju\Documents |
| %csidl_Pictures% | C:\Users\Zenju\Pictures |
| %csidl_Music% | C:\Users\Zenju\Music |
| %csidl_Videos% | C:\Users\Zenju\Videos |
| %csidl_Downloads% | C:\Users\Zenju\Downloads |
| %csidl_Favorites% | C:\Users\Zenju\Favorites |
| %csidl_Resources% | C:\Windows\Resources |
| %csidl_QuickLaunch% | C:\Users\Zenju\AppData\Roaming\Microsoft\Internet Explorer\Quick Launch |
| %csidl_StartMenu% | C:\Users\Zenju\AppData\Roaming\Microsoft\Windows\Start Menu |
| %csidl_Programs% | C:\Users\Zenju\AppData\Roaming\Microsoft\Windows\Start Menu\Programs |
| %csidl_Startup% | C:\Users\Zenju\AppData\Roaming\Microsoft\Windows\Start Menu\Programs\StartUp |
| %csidl_Nethood% | C:\Users\Zenju\AppData\Roaming\Microsoft\Windows\Network Shortcuts |
| %csidl_Templates% | C:\Users\Zenju\AppData\Roaming\Microsoft\Windows\Templates |
Note: Most of the macros above have a variant for public folders, e.g. %csidl_Documents% has %csidl_PublicDocuments%.
Hint: You can add flexibility to an .ffs_batch configuration file by creating new temporary environment variables in a bat or cmd file that are evaluated by FreeFileSync at runtime:
Example:
The FreeFileSync batch file C:\SyncJob.ffs_batch contains macro %MyVar% instead of an absolute target folder and is invoked by a cmd file:set MyVar=C:\Target
"C:\Program files\FreeFileSync\FreeFileSync.exe" C:\SyncJob.ffs_batch
"C:\Program files\FreeFileSync\FreeFileSync.exe" C:\SyncJob.ffs_batch
::%MyVar% is resolved as C:\Target during synchronization
Note
Temporary environment variables created with the set command are only valid if the synchronization is started by calling the FreeFileSync executable directly. Using start /wait would create a new program context without these temporary variables.
Temporary environment variables created with the set command are only valid if the synchronization is started by calling the FreeFileSync executable directly. Using start /wait would create a new program context without these temporary variables.
Performance Improvements
 FreeFileSync can perform multiple file accesses simultaneously.
This speeds up synchronization times dramatically in
cases where single I/O operations have significant latency
(e.g. long response times on a slow network connection)
or they cannot use the full bandwidth available
(e.g. an FTP server enforcing a speed limit for each connection).
FreeFileSync can perform multiple file accesses simultaneously.
This speeds up synchronization times dramatically in
cases where single I/O operations have significant latency
(e.g. long response times on a slow network connection)
or they cannot use the full bandwidth available
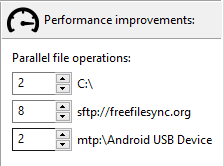
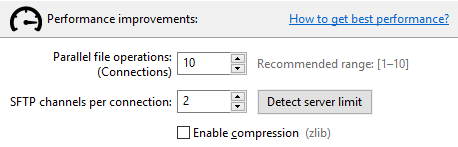
(e.g. an FTP server enforcing a speed limit for each connection).You can configure the number of parallel file operations per device in the Comparison Settings dialog. It is evaluated for all folder pairs of a configuration as follows:
- During comparison FreeFileSync groups all folders by their root devices.
For example, consider a configuration with two folder pairs and parallel file operations set up: FreeFileSync will put the folders C:\Source and C:\Source2 into the same group for device root C:\ and allow only 1 file operation at a time. Folder D:\Target will be traversed using 2 operations, and E:\Target using 3 operations at a time. Overall, FreeFileSync will scan all four folders using 6 parallel operations.C:\Source ↔ D:\Target C:\Source2 ↔ E:\Target Device root Parallel operations C:\ 1 D:\ 2 E:\ 3
- When synchronizing a folder pair, FreeFileSync
will use the maximum of the number of parallel operations supported by the two folders.
In the previous example the folder pair C:\Source ↔ D:\Target will be synchronized using 2 parallel operations, and C:\Source2 ↔ E:\target will be using 3.
Note
FreeFileSync implements parallel file operations by opening multiple connections to a device. Certain devices, like SFTP servers, have connection limits and will fail if too many connection are attempted; see (S)FTP Setup.
FreeFileSync implements parallel file operations by opening multiple connections to a device. Certain devices, like SFTP servers, have connection limits and will fail if too many connection are attempted; see (S)FTP Setup.
 RealTimeSync
— Automated Synchronization —
RealTimeSync executes a command line every time it detects changes in a monitored directory, or when a directory becomes available (e. g. insert of a USB-stick). Usually this command line will trigger a FreeFileSync batch job.
RealTimeSync receives change notifications directly from the operating system, eliminating the need for continuous polling for changes. Each time a file or folder is created/updated/deleted in the monitored directories or their sub directories, RealTimeSync waits until a user-configurable idle time has passed with no further detected changes, then runs the command line. This makes sure the monitored folders are not in heavy use when starting a synchronization.
Example: Real time synchronization using FreeFileSync
Start RealTimeSync.exe from FreeFileSync's installation directory and select the folders to monitor. Instead of doing this manually you can import an .ffs_batch file via Menu → File → Open or simply via drag and drop. RealTimeSync will extract relevant directories for synchronization and set up the command line to execute the .ffs_batch file when changes are detected. Now press Start to begin monitoring.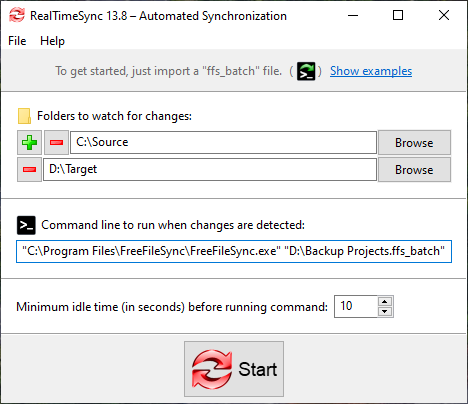
Note
- The command should not block progress. If you call a FreeFileSync batch job, make sure it won't show any popup dialogs. See notes in Command Line Usage.
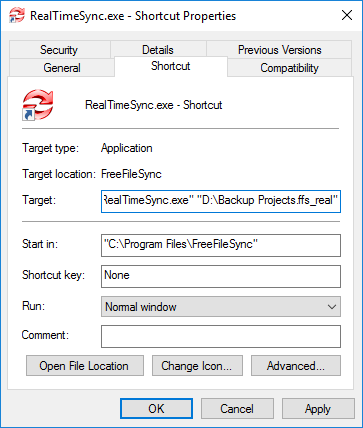
- If you pass an .ffs_real configuration file,
RealTimeSync will skip the main dialog and start monitoring immediately.
This can be used to integrate RealTimeSync into the operating system's auto start:
"C:\Program Files\FreeFileSync\RealTimeSync.exe" "D:\Backup Projects.ffs_real" - You can also pass an .ffs_batch file as first argument, which RealTimeSync will automatically convert into an .ffs_real configuration with default settings (e.g. 10 seconds idle time).
- RealTimeSync does not require you to start FreeFileSync. It can also be used in other scenarios, like sending an email whenever a certain directory is modified.
Example: Automatic synchronization when a USB stick is inserted
Save an .ffs_batch configuration in the USB stick's root directory, (e.g., H:\) and let FreeFileSync run it when the stick is mounted. But, instead of hard coding the USB drive letter H:\ (which may change occasionally), refer to the USB stick via its volume label instead.Configure RealTimeSync as follows:
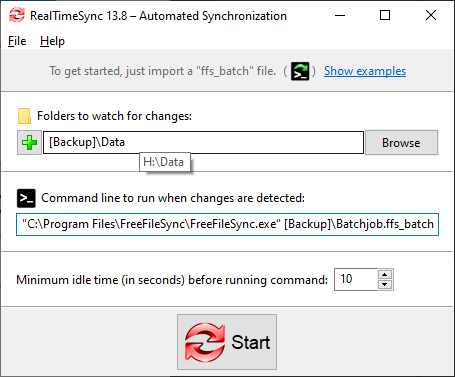
"Backup" is the volume label of the USB stick in our example.
Whenever directory H:\Data becomes available, RealTimeSync executes the command line which starts the batch job located on the stick. RealTimeSync will also trigger each time files are modified in H:\Data.
Note
The full path of the last changed file and the action that triggered the change notification (create, update or delete) are written to the environment variables %change_path% and %change_action%.
They are only visible for the command line that RealTimeSync is executing.
The full path of the last changed file and the action that triggered the change notification (create, update or delete) are written to the environment variables %change_path% and %change_action%.
They are only visible for the command line that RealTimeSync is executing.
Example: Log names of changed files and directories
Log all changes to a file: (Windows)echo %change_action% %change_path% >> %csidl_Desktop%\log.txt
Log all changes to a file: (Linux/macOS)
echo $change_action $change_path >> ~/Desktop/log.txt
Limitations:
- If multiple changes occur simultaneously, only the first file's path is written to %change_path%.
- While RealTimeSync is executing the command line, monitoring for changed files is temporarily inactive.
- RealTimeSync relies on receiving change notifications from the operating system. In some cases it just doesn't receive any, e.g. a network path with badly-written/incomplete driver implementation. These buggy drivers often do not fail with an error code, but just do nothing.
The command line usually starts a synchronization task using FreeFileSync, which generates additional file change notifications. Therefore, the RealTimeSync change detection has to be deactivated to not go into an endless loop. On the other hand, it is not likely that changes (other than those from FreeFileSync) happen in first place since RealTimeSync runs the command line only after the user-specified idle time has passed. In any case, files changed during the execution of FreeFileSync will be synchronized the next time FreeFileSync runs.
RealTimeSync: Run as Service (Windows)
RealTimeSync runs as a background process, requiring no further interaction. There are several ways to start it automatically, depending on your needs. Generally, the goal is to execute a command line of the form:<FreeFileSync installation folder>\RealTimeSync.exe <path to *.ffs_real or *.ffs_batch file>
"C:\Program Files\FreeFileSync\RealTimeSync.exe" "D:\Backup Projects.ffs_real"
Example: Run RealTimeSync on Windows login
Create a shortcut with the command line above as target, then place it in the Windows autostart folder. (Type shell:startup in the Windows Explorer address bar to find the folder quickly.)
Example: Start RealTimeSync as a Service
To keep RealTimeSync running irrespective of currently logged-in users: Create a task in Windows task scheduler to run the command line above when the system starts. See Schedule Batch Jobs for an example of how to add a task. Then set the task to run under the SYSTEM account, which is always running in the background.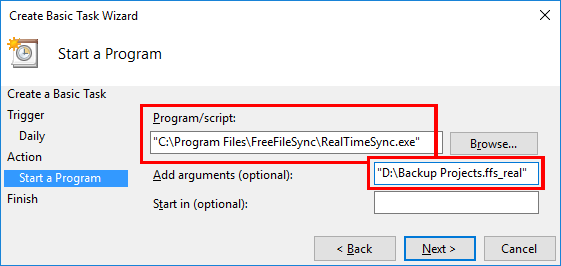
Schedule Batch Jobs
- Create a batch job in FreeFileSync by selecting: Menu → File → Save as a batch job...
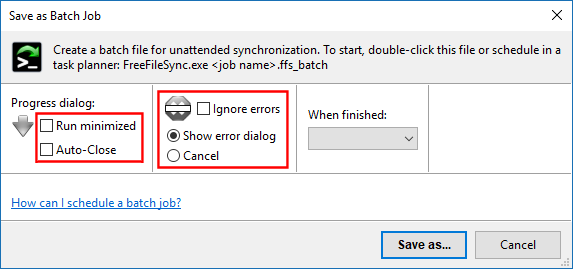
- By default, FreeFileSync displays a progress dialog during synchronization and
will wait while the summary dialog is shown.
If the progress dialog is not needed, enable the Run minimized checkbox and
also set Auto-Close if you want to skip the summary dialog at the end.
Note
You can make the progress dialog visible at any time during synchronization by double-clicking the FreeFileSync icon in the notification area, if it's initially hidden.
- To prevent error or warning messages from delaying synchronization when no user is present,
either enable Ignore errors or set Cancel to halt at the first error.
- You can start the FreeFileSync batch job by double-clicking the .ffs_batch file
or by scheduling it using your operating system's scheduler:
Note
Enable Auto-Close and Ignore errors/Cancel if the .ffs_batch file is scheduled to run under a different user account. With no one there to close the results dialog manually, the task would hang indefinitely.
Enable Auto-Close and Ignore errors/Cancel if the .ffs_batch file is scheduled to run under a different user account. With no one there to close the results dialog manually, the task would hang indefinitely.
Windows: Task Scheduler
- Open the Task Scheduler either via the start menu, or enter taskschd.msc in the run dialog (keyboard shortcut: Windows + R).
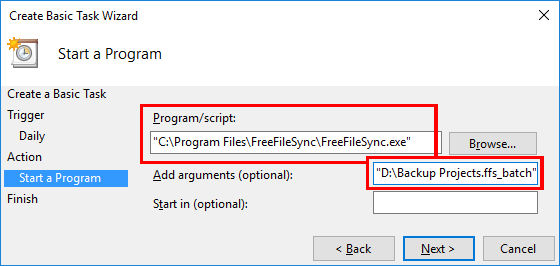
- Create a new basic task and follow the wizard steps.
- Make Program/script point to the location of FreeFileSync.exe and insert the
.ffs_batch file into Add arguments.
- Put quotation marks around paths with spaces to prevent misinterpretation as multiple non-existent paths.
e.g. like "D:\Backup Projects.ffs_batch"
Note
- Program/script always needs to point to an executable file like FreeFileSync.exe even when the .ffs_batch file association is registered. If an .ffs_batch file was entered instead, the task would return with error code 2147942593 (0x800700C1), "%1 is not a valid Win32 application".
- If you schedule FreeFileSync to run under a different user account, note that the configuration file
GlobalSettings.xml will also be read from a different path,
C:\Users\<username>\AppData\Roaming\FreeFileSync,
or in the case of the SYSTEM account from
C:\Windows\System32\config\systemprofile\AppData\Roaming\FreeFileSync.
You can force usage of a particular GlobalSettings.xml file by passing it as a Command Line parameter.
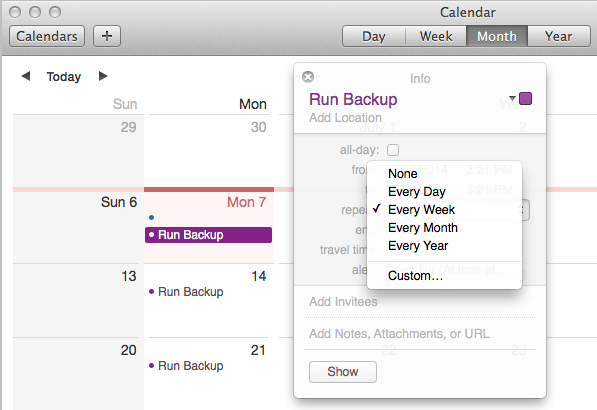
macOS: Automator and Calendar
- Open Launchpad and launch Automator.
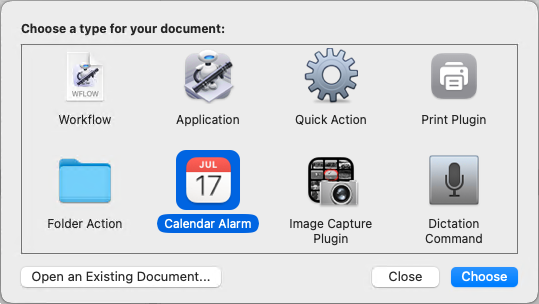
- Create a new Calendar Alarm.
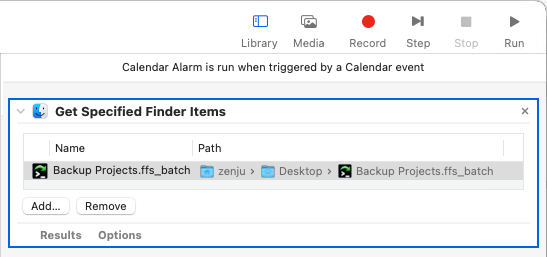
- Drag and drop the .ffs_batch file on the workflow panel.
- Double-click Actions / Files & Folders / Open Finder Items to add it to the workflow.
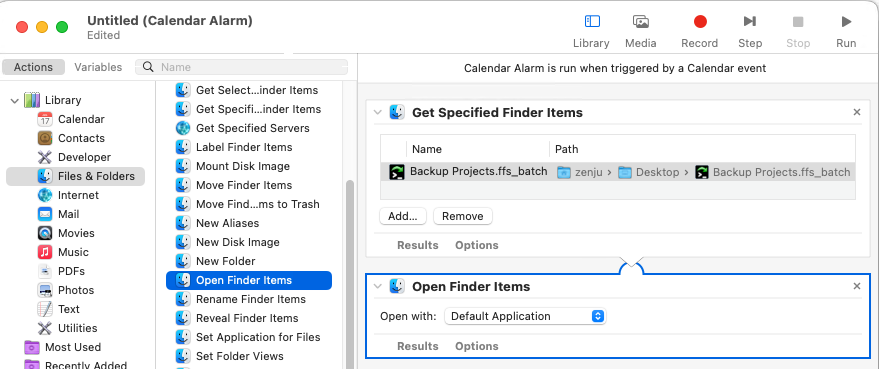
- Go to File → Save... and save the Automator job.

- The Calendar app will open automatically with the Automator job scheduled for today.
You can now select a different time for synchronization or make it a recurring task.
Linux/macOS: Cron Job
Cron runs arbitrary commands at specified intervals.To schedule a FreeFileSync batch job, construct a command line for cron consisting of the path to the FreeFileSync executable followed by the path to the FreeFileSync batch job, e.g.
/opt/FreeFileSync/FreeFileSync "/home/zenju/Backup Projects.ffs_batch"
macOS: The executable is located inside the application package, e.g. for an all-users installation:
/Applications/FreeFileSync.app/Contents/MacOS/FreeFileSync
Open cron's table of scheduled jobs for editing:
crontab -e
Note
Cron might use a text editor you are not familiar with. A different editor can be selected via the "EDITOR" environment variable, e.g. nano, or gedit:
Cron might use a text editor you are not familiar with. A different editor can be selected via the "EDITOR" environment variable, e.g. nano, or gedit:
EDITOR=nano crontab -e
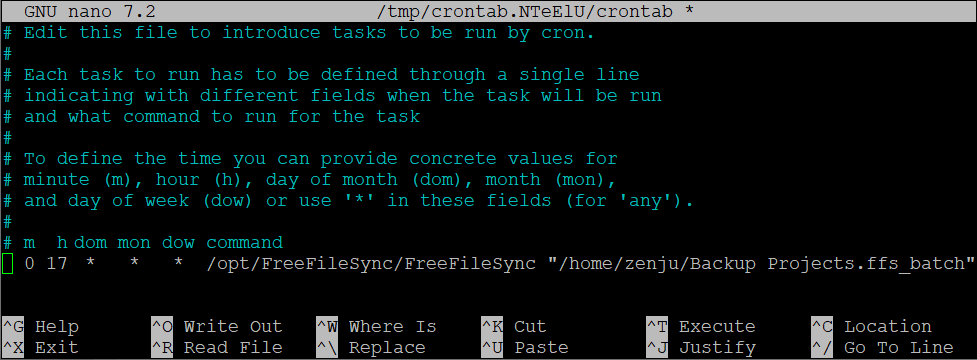
Example: Start crontab using the nano text editor
Each crontab line begins with conditions for recurring execution of the command line that follows. Cron's basic concept is to run a command every minute unless constraints are applied:
To run every hour, set the minute to a fixed value:
| # | minute | hour | day of month | month | day of week |
| 0 | * | * | * | * |
To run once every day, set both minute and hour; e.g. run daily at 17:00:
| # | minute | hour | day of month | month | day of week |
| 0 | 17 | * | * | * |
Multiple items are separated by ",", ranges specified using "-", and interval steps by "/".
| # | minute | hour | day of month | month | day of week |
| */10 | 9-17 | * | * | mon,fri |
Example: Run every 10 minutes but only from 9:00 to 17:00 and only on Monday and Friday
To run once after each system startup, use alternative syntax "@reboot":
@reboot sleep 60; /opt/FreeFileSync/FreeFileSync "/home/zenju/Backup Projects.ffs_batch"
Example: Start synchronization 60 seconds after system reboot
Troubleshooting
If there's no visible activity or synchronization log generated when Cron runs, redirect the standard output and error streams to a log file.
This will allow you to confirm whether Cron executed, and whether any diagnostic information was emitted.
If there's no visible activity or synchronization log generated when Cron runs, redirect the standard output and error streams to a log file.
This will allow you to confirm whether Cron executed, and whether any diagnostic information was emitted.
/opt/FreeFileSync/FreeFileSync "/home/zenju/Backup Projects.ffs_batch" >> /home/zenju/Desktop/cron_log.txt 2>&1
Example: Standard output is appended to cron_log.txt via >>.
2>&1 redirects the error stream(2) to standard output stream(1).
2>&1 redirects the error stream(2) to standard output stream(1).
Scripting
When FreeFileSync is run via the command line, the synchronization result is written to standard output in JSON format. This output can be evaluated by scripts to customize functionality.Windows: To view FreeFileSync's standard output, the pipe (|) operator is required because the operating system classifies FreeFileSync as a GUI application rather than a console application:
FreeFileSync.exe "D:\Backup Projects.ffs_batch" | more
{
"syncResult": "success", → can be: success, warning, error, cancelled
"startTime": "2026-07-31T19:55:42+00:00",
"totalTimeSec": 12,
"errors": 0,
"warnings": 0,
"totalItems": 1000,
"totalBytes": 1024,
"processedItems": 1000,
"processedBytes": 1024,
"logFile": "D:\\Logs\\Backup Projects 2026-07-31 195542.123.html"
}
Parsing sync result via PowerShell
Windows batch scripts (.cmd/.bat) cannot parse JSON, so PowerShell can be used instead:Example: Delete unnecessary log files
#run an .ffs_batch config and parse the JSON output
$data = & "C:\Program Files\FreeFileSync\FreeFileSync.exe" "D:\Backup Projects.ffs_batch" | ConvertFrom-Json
#delete the log file if no items were synced
if ($data.syncResult -eq "success" -and $data.totalItems -eq 0)
Remove-Item $data.logFile
$data = & "C:\Program Files\FreeFileSync\FreeFileSync.exe" "D:\Backup Projects.ffs_batch" | ConvertFrom-Json
#delete the log file if no items were synced
if ($data.syncResult -eq "success" -and $data.totalItems -eq 0)
Remove-Item $data.logFile
Parsing sync result via Python
On Linux, the same task can be implemented using Python:
#!/usr/bin/env python3
import json, subprocess, os
#run an .ffs_batch config and parse the JSON output
result = subprocess.run(
["/opt/FreeFileSync/FreeFileSync", "/home/zenju/Backup Projects.ffs_batch"], stdout=subprocess.PIPE, text=True)
data = json.loads(result.stdout)
#delete the log file if no items were synced
if data["syncResult"] == "success" and data["totalItems"] == 0:
os.remove(data["logFile"])
Synchronization Settings
Synchronization Variants
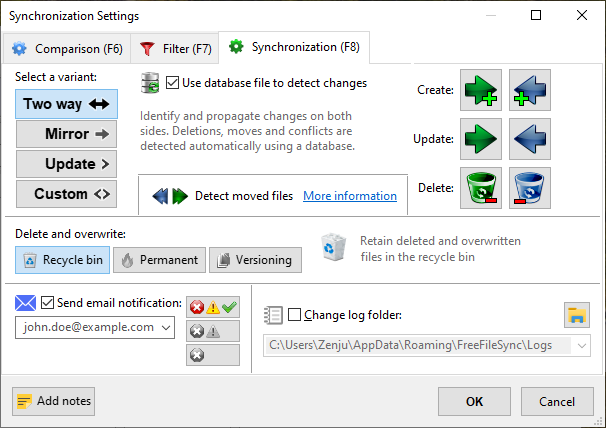
Three basic variants are available:- If both left and right folders contain files you're working on, and you want changes
(creates, updates, and deletes) to flow in both directions, then select Two way.
Database files ("sync.ffs_db") will be created after the first sync and be used to compare the current file system state against the last synchronization in order to determine the sync directions.
- If one folder contains your work files and the other is for backup, then select the Mirror variant.
The left folder is the source and the right folder is the target. The synchronization will create and delete files on the target as needed until it is an exact copy of the source.
- If you only want to add files to your backup, but never delete, then select the Update variant.
Files deleted on the source side will not be deleted on the backup drive (e.g. after you've made room for new photos on a digital camera). On the other hand, files deleted on the backup drive will not be copied again (e.g. after you have removed photos you don't want to keep).
In order to handle special synchronization scenarios, you can also set up Custom rules. These can either be based on the categories determined after folder comparison (left/right only, left/right newer), or on detected changes (create, update, delete) if you select Use database file to detect changes.
Detect Moved Files
FreeFileSync is able to detect moved files and apply the same move efficiently on the target side during synchronization instead of a slow copy and delete. To make this work, Use database file to detect changes must be checked and the file system must support file IDs.
Note
- Detection of moved files is not yet possible when synchronizing a folder pair for the first time. Only starting with the second sync the database files are available to determine moved files.
- Detection is not supported on file systems that don't have stable file IDs. Most notably, certain file moves on FAT file systems cannot be detected. Also, protocols like SFTP do not support move detection. In these cases, FreeFileSync will automatically fall back to "copy and delete".
SFTP and FTP Setup
FreeFileSync supports synchronization with SFTP and FTP when you enter your login information in the cloud folder selection dialog: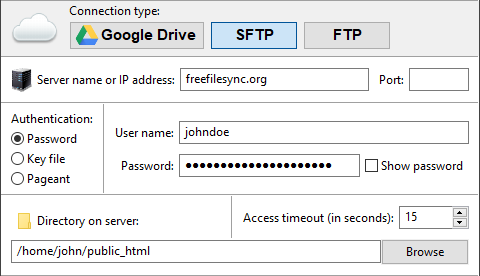
Note
If the (S)FTP server sets file modification times to the current time, you can use Compare by File Size as a workaround. Alternatively, set up the Two-way synchronization variant to have files with newer dates copied back from the server during the next sync.
If the (S)FTP server sets file modification times to the current time, you can use Compare by File Size as a workaround. Alternatively, set up the Two-way synchronization variant to have files with newer dates copied back from the server during the next sync.
Configure SFTP for Best Performance
By default, FreeFileSync creates one connection to the server with a single SFTP channel, meaning only one SFTP command can be sent or received at a time. Since most of this time is spent waiting due to the high latency of the remote connection, you can speed up reading large folder hierarchies by increasing both the connection and channel count.The folder reading time is reduced by a factor of N x M when using N connections, each with M channels.
Example: Using 10 connections with 2 channels each can make folder reading up to 20 times faster.
- Creating additional connections and channels takes time.
If you're scanning a small remote folder, setting up too many connections and channels might slow down the process.
Creating extra connections is slower than creating extra channels.
- SFTP servers have internal limits on the number of allowed connections and channels.
Generally, servers expect one connection per user, so this number should be kept rather low.
If too many connections and channels are used, the server may decide to stop responding.
- Unlike connections, additional SFTP channels are only used during folder reading (comparison), not during synchronization.
- Enable compression to improve performance if the connection to the SFTP server is slow and the data is mostly uncompressed (e.g. transferring text files over a slow internet connection). However, if the connection is very fast (e.g. a local network) or the data is already compressed (e.g. zip files), the CPU overhead of the zlib compression algorithm might slow transfer speeds. In such cases the option is better left unchecked.
Advice
Start with low values and test different combinations of connections and channels for your SFTP synchronization scenario find the best speed. Note that FreeFileSync reuses existing SFTP connections and channels. Therefore, restart FreeFileSync before testing SFTP speed.
Start with low values and test different combinations of connections and channels for your SFTP synchronization scenario find the best speed. Note that FreeFileSync reuses existing SFTP connections and channels. Therefore, restart FreeFileSync before testing SFTP speed.
Tips and Tricks
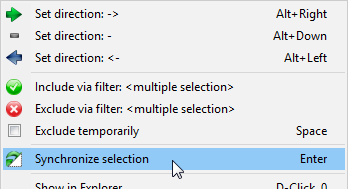
Change settings with a single mouse click: Press and hold the right mouse button until the context menu is shown, then release while over the selection: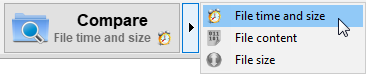

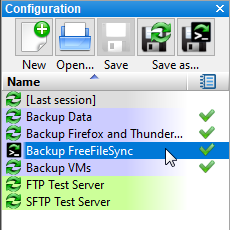
Select multiple configurations at a time:
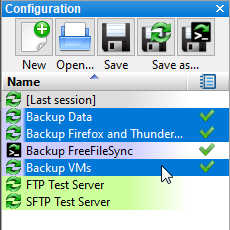 Select multiple items with the mouse, and refine the selection by holding the CTRL key while clicking.
Start comparison directly by double-clicking on a configuration:
 Run a partial synchronization only for the currently selected files:
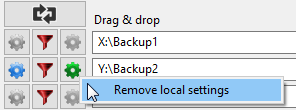
 Synchronize multiple folder pairs at a time with different configurations:
 Start synchronization directly without clicking on compare first:
 Move a window by clicking on an empty area and holding the mouse button:
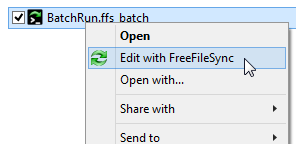
 Open a batch configuration for edit via the Windows Explorer context menu:
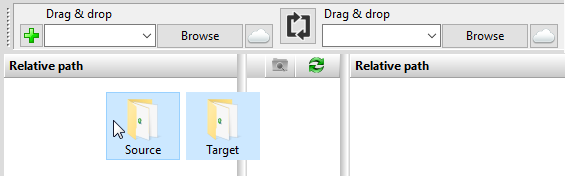
 Drag and drop two folders at a time from Windows Explorer to fill a folder pair in one go:
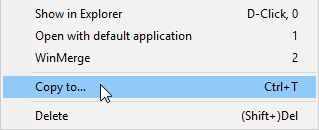
 Copy files selected on the main dialog to an alternate folder and thous saving a "diff":
 Use a volume label instead of a drive letter:
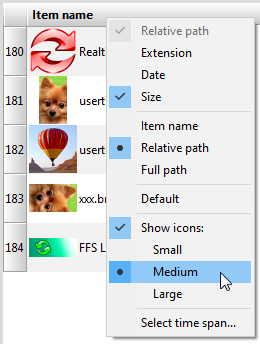
 Show thumbnail icons via the column header context menu:
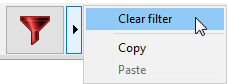
 Save the current view filter selection as default:
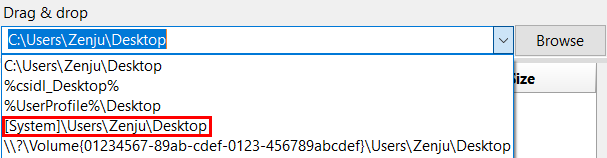
 Remove obsolete paths from the folder drop-down by using mouse hover and Delete key:
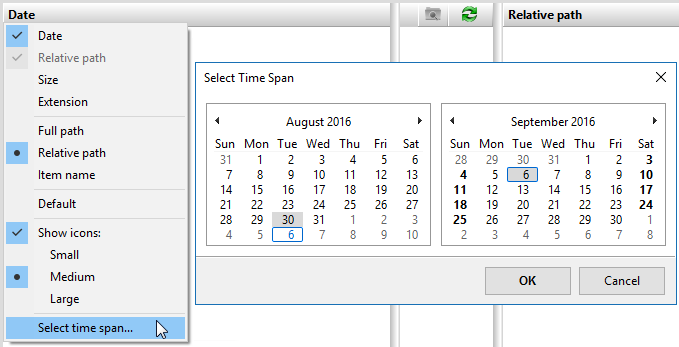
 Select a time span for files to include via the date column context menu:
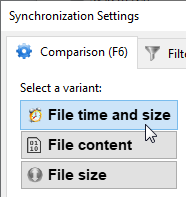
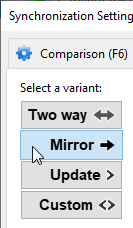
 Double-click on comparison and synchronization variants to confirm the dialog:
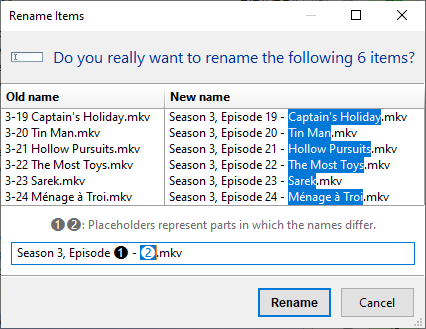
 Select multiple files and rename all of them simultaneously (via context menu or F2 key):
Variable Drive Letters
USB memory sticks or external hard disks often get assigned different drive letters than the last time they were plugged into the computer. FreeFileSync offers the following solutions:Option 1: Specify a path by using a unique volume label instead of a drive letter:
E.g. [Backup-Disk]\folder
instead of E:\folder when the USB stick in drive
E: is named "Backup-Disk".You can change a volume label by right-clicking on the drive letter in Windows Explorer and selecting Rename.
Option 2: Refer to a disk volume by its unique GUID:
E.g. \\?\Volume{01234567-89ab-cdef-0123-456789abcdef}\folder
A volume GUID uniquely identifies a particular drive partition, and will not change over time.
To get an overview of all volume GUIDs for mounted drives on the system you can run the mountvol command-line tool.
Note
It is not required to look up and enter a volume label, volume GUID, or macro manually. Simply select an alternative path from the drop-down menu:
It is not required to look up and enter a volume label, volume GUID, or macro manually. Simply select an alternative path from the drop-down menu:
File Versioning
When you need to preserve files that have been deleted or overwritten, selecting Recycle bin in synchronization settings is often sufficient. However, this is only available for local drives and offers limited control over how files are stored and how long they are kept. FreeFileSync therefore has an additional option, Versioning.1. Keep only the most recent versions
In synchronization settings, set deletion handling to Versioning and naming convention to Replace. Deleted files are moved to the specified folder without any added decoration, replacing older versions that exist.
2. Keep multiple versions of old files
- Set deletion handling to Versioning and naming convention to Time stamp [File].
FreeFileSync moves deleted files into the specified folder and appends a time stamp to each file name.
The folder structure is preserved, making it easy to access older versions via a file browser.
Example: Last versions of the file Folder\File.txt inside folder D:\Revisions D:\Revisions\Folder\File.txt 2020-12-11 111111.txt
D:\Revisions\Folder\File.txt 2020-12-12 122222.txt
D:\Revisions\Folder\File.txt 2020-12-13 133333.txt
- With naming convention Time stamp [Folder] files are moved into a time-stamped subfolder
within the versioning folder, while their original names are preserved.
This allows you to manually undo a synchronization by moving files from the
versioning folder back to their original locations.
Example: Last versions of the file Folder\File.txt inside folder D:\Revisions D:\Revisions\2020-12-11 111111\Folder\File.txt
D:\Revisions\2020-12-12 122222\Folder\File.txt
D:\Revisions\2020-12-13 133333\Folder\File.txt
3. Save versions at certain intervals
Using the Replace naming convention, you can control version granularity by adding Macros to the versioning folder path. For example, to save deleted files daily, add the %date% macro:Example: Last versions of the file Folder\File.txt inside folder D:\Revisions\%date%
D:\Revisions\2020-12-11\Folder\File.txt
D:\Revisions\2020-12-12\Folder\File.txt
D:\Revisions\2020-12-13\Folder\File.txt
D:\Revisions\2020-12-12\Folder\File.txt
D:\Revisions\2020-12-13\Folder\File.txt
Volume Shadow Copy (Windows only)
FreeFileSync supports copying locked or in-use files by creating a Volume Shadow Copy of the source drive. You can configure this feature via Menu → Tools → Options: Copy locked files.
Note
- The volume snapshot created by the Volume Shadow Copy Service is only used for copying files that are currently locked.
- Accessing the Volume Shadow Copy Service requires FreeFileSync to run with administrator privileges.